
Video Transcript:
Here's the agenda of what we're going to go over. We are going to do a quick overview of direct-to-garment printers. We're also going to compare that and look at dye sub printers. Then we will review the differences and we'll take a look at some examples. Then we'll come back to the PowerPoint and review startup costs and some of the requirements and talk through that. So let's get started.
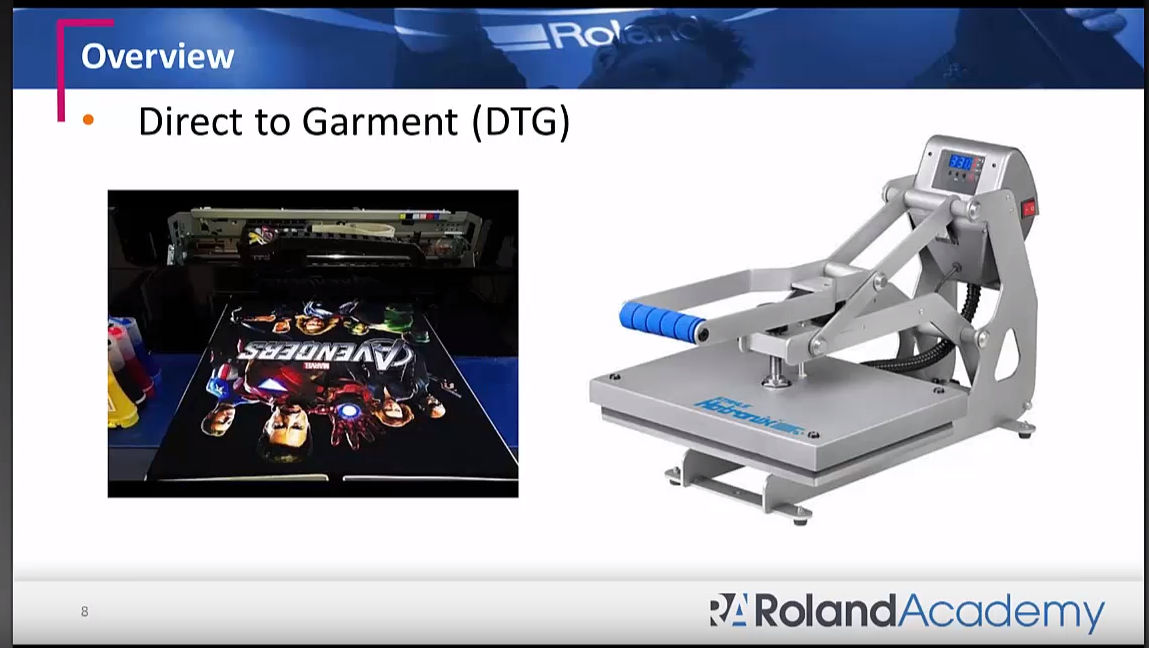
Overview of Direct to Garment (DTG) Printers
Direct-to-garment or DTG printers use water-based pigment inks. If you're used to printing with eco-solvent printers or even UV inks where you print on to your media and the colors and everything just pops immediately, that's something you're going to see with a DTG printer. That's going to be the most familiar to you. When you load your shirt, your fabric…you start printing and the colors pop. And if you're used to printing, say, on clear media with eco solvent inks and white ink where you lay your white layer down first and then you lay your colors on top of it, this is very similar for DTG so it's almost more comfortable for some people when going to a DTG printer because it's very familiar. You get that instant pop, it looks great. Very similar, in a sense, to printing with eco solvent inks.
Let's get started. The DTG printer, you will notice, are a lot smaller than an inkjet printer. They look like your nice little inkjet printer that you can put on your desk anywhere. So it's a smaller footprint. For those of you that are looking to expand and lack the space, then this looks pretty enticing. You load your fabrics on to a platen and then it comes with a standard size, so you can change to a different platen if you have an extra large t-shirt or a child's shirt. There are different platens to put your fabric on, in a way to load your media. Then there are other platens for sleeves and other more specialty items so that way you can also print directly. Now pigment inks work best for cotton than synthetics and polyesters but the pigment technology has improved. A lot of DTG manufacturers claim that you can print on cotton 50/50 blends. You can even do polyester and synthetics. Regardless of type of fabric, you will need to pre-treat. And pre-treatment is very important. Now here's what you do beforehand. When you go to a cool trade show you see them print, you don't see behind the scenes. Let me just share some of the behind the scenes so that way you can have a more accurate idea of what you're getting into.
Pre-treatment
You first start by pre-treatment and there's a simple way to do it. First start by pressing the garment for about 10-15 seconds. That will flatten any loose fibers that may be on your fabric because you really want to start with a nice smooth surface. Ok, so you're pressing it for about 10-15 seconds. Then the next step is to pre-treat it. You can get this cool little Wagner sprayer where you mix in your pre-treatment solution. You usually mix it with distilled water. Depending on the type of fabric, it's usually 1-to-1 for dark colors and you can add more water if it's like-colored fabric. This prepares the surface to receive the ink. Once you spray on your pre-treatment or some people use a roller (one of those paint rollers) to brush it on, you want to make sure you get a nice even coating. It is very critical. That way you will have a good bond. It's even more critical when you have dark colors and very porous materials like the blends or even polyester rayon because, once again, you need to fill out those pores to create a more even surface. That way your colors will pop.
Once you're done, you want to brush off any excess pre-treatment fluids and you want to brush in a downward motion so that way the fibers are lying flat. If you brush too hard, you're brushing off the excess. As you're seeing, it does require some skill to make sure everything is prepared properly. Now from what I've heard and seen, the recommendation is to let everything air dry: Let all the liquid evaporate and air dry. But you may not have the time so you may need to just do a quick press. But this is just more so the application. You can do this manually. Now if your business starts picking up and you need that consistency and something that takes a lot less time, there are pre-treat sprayer drawers where you can load your material in. It does a quick spray and you can program in the amount of pre-treat that you need and it sprays on evenly. It's a neat nifty machine but of course it's going to cost a little bit more than your handy dandy roller and stuff like that. But you know on the flip side, you do get to save money.
So when you go to a trade show and they load up the fabric, most of the time it is pre-treated. Now some people say you don't need to pre-treat light colors or white, so you can save some costs. That would also definitely save some time. But then I heard that the wash fastness is not as good because that pre-treatment allows you to have that nice pop and color after multiple washes. So that's something to think about.
Press Garment
Once you've done this and if you're not going to do an air dry, you can press your garment to make sure everything evaporates. Press it for about 20-30 seconds. That way everything is ready. That surface is ready for you to start your printing. That is the normal process for direct to garment printer. From this point you can start your printing.
Printing
If you're doing dark colors, you lay your white ink first and then you lay your colors and then your CMYK on top of that. You're not done. There's one more step. And even though you print on it and it looks awesome, the colors pop. You do need to fix it. You still need to heat press it so that way the ink will cure. That can take another 60 to 90 seconds on top of that. So unlike printing, let's say with eco solvent inks, when you're printing on to a media, once you print, you let dry you're good to go. Well, for direct to garment printing, you still need a heat press where you will cure the inks and then also, depending on the type of paper that you put over the inks before you press, it can also determine the type of texture and finish of the inks you'll get.
For instance, if you use a parchment paper to lay on top of the ink, after you're done with pressing your inks, an image will have a smooth matte finish. Now if you use a Teflon paper or some sort of release paper, you'll get a glossy finish. So it's going to mirror that paper or whatever you put on there. It's going to kind of grab that finish and the texture. If you do an indirect pressure, you may get a rougher hand more like a screen printing feel. So you have some versatility in that sense in regards to the end results. With white inks you have that versatility where you can print on dark colors. But with white inks there comes other issues as well. Just be aware that the particles of the titanium dioxide that's used in white ink pigments have a tendency to clog the nozzles. Unless you are running white ink every day, it may be best to look into not doing dark color T’s in the beginning. That was just some food for thought regarding what we saw and heard from people with DTG printers.
Overview of Dye-Sublimation Printer
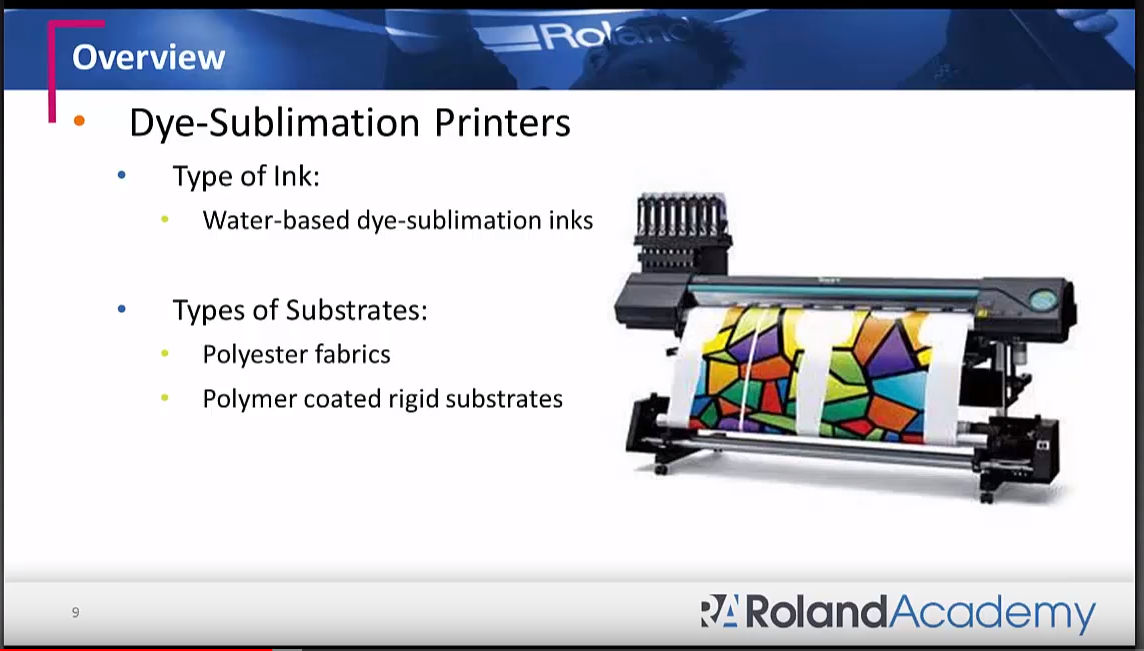
Alright so now let me go over, real briefly, dye sublimation printers. What I have here is a picture of our new RT-640 dye-sub printer. Now it is a 64-inch printer so definitely a bigger footprint. There are smaller desktop printers, but we do not make those. But the technology is similar. However, with the bigger printers like ours you're going to get better resolutions. And actually the cost to run it is better just because you have the bulk ink system and things like that. Just for example, this image that you're seeing, is dye sublimation transfer printing, meaning it is printed on a transfer paper. We'll go over more of the details on that. So basically, dye-sublimation printers use water-based inks as well but it is a dye-sublimation ink and the types of substrates you would use would be either polyester fabrics or a polymer coated rigid substrate. So you have a little bit more flexibility in regards to the variety of things you can produce with dye-sublimation.
Printing Dye-Sublimation
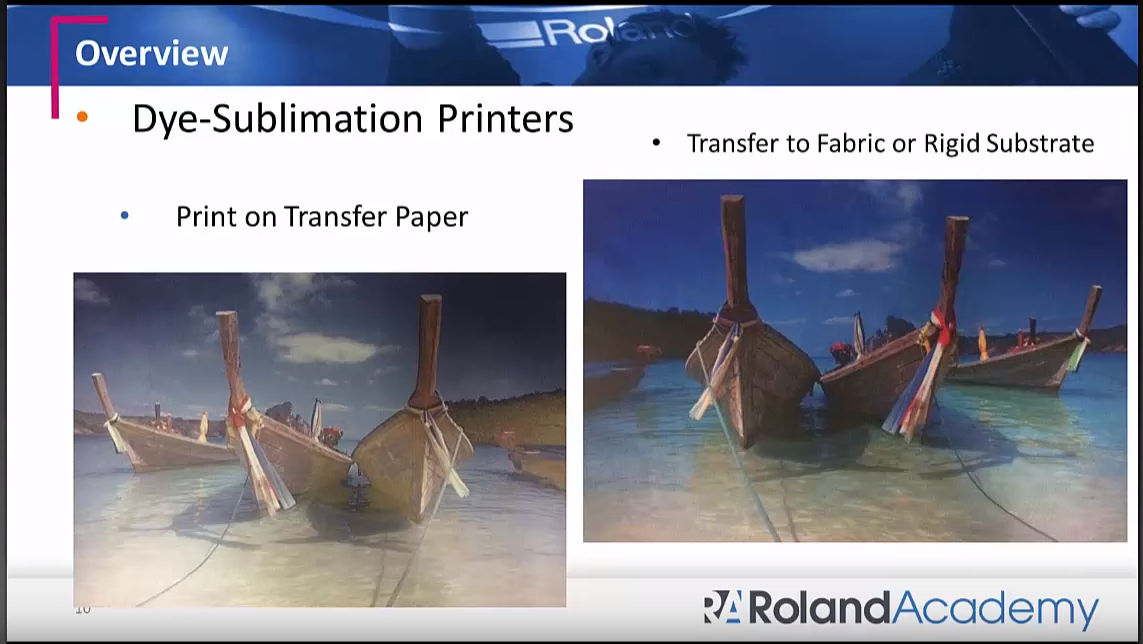
All right, so let me take you through what dye-sublimation printers and prints look like. Because if you're not used to it, it can kind of throw you off. First, you're printing on transfer paper and it's going to look dull. If you're looking for that instant color pop you're not going to see it. So you're going to look at this paper come through the printer with these prints. It is going to look very dull and it is printed in mirror image. So where sublimation takes place is at the heat press. That's where the magic of sublimation takes place. That's when the colors will pop. For dye-sublimation, you need heat - about 400 degrees - and pressure - usually medium pressure - to activate the inks. So what you have is solid inks on your transfer paper. It's sitting on your paper. You put it against your polyester fabric or poly coated rigid substrate. You apply four hundred degrees and pressure. That's when the solid ink sublimates into gas. It bypasses the liquid phase and it's elevated to gas, going into the fibers - the polyester fibers or the polymer coating - and becomes solid again. Now it becomes one with that fabric or that rigid substrate because now it's not just sitting on top, it has now become part of the fibers or the coating. So with that, you will see the colors pop and the vibrancy. And, with it being part of the polyester fabrics, you have excellent wash-fastness so you can wash it year after year and it will look really nice - the colors will still pop. So the ideal process is, when you discard your transfer paper you should have about eighty to ninety percent of the inks transfer. That solid ink transfers from the transfer paper into your fabric. That's where you're going to see the difference. You're not going to see the pop immediately after your print. You will see the pop at the heat press. So that is the main difference.
Types of Heat Presses
From there, depending on what type of sublimation or projects you're doing, that will determine the types of heat presses. Now, this big red guy on the left is your calendar heat press. These are great if you're going to do soft signage. Long pieces of fabrics, flags and things of that nature. It's like a big laminator but it gets to 400 degrees. So what you do is you print on your transfer paper and when you're done you take that roll (it is for roll-to-roll printing) and load it onto the press. Next, take your roll of fabric, load it on the press, and it marries the two together. It will go through these calendar rolls with heat (400 degrees) and pressure and then the transfer begins. Then you have this nice roll of fabric where the images are transferred to. So that's your bigger guy.
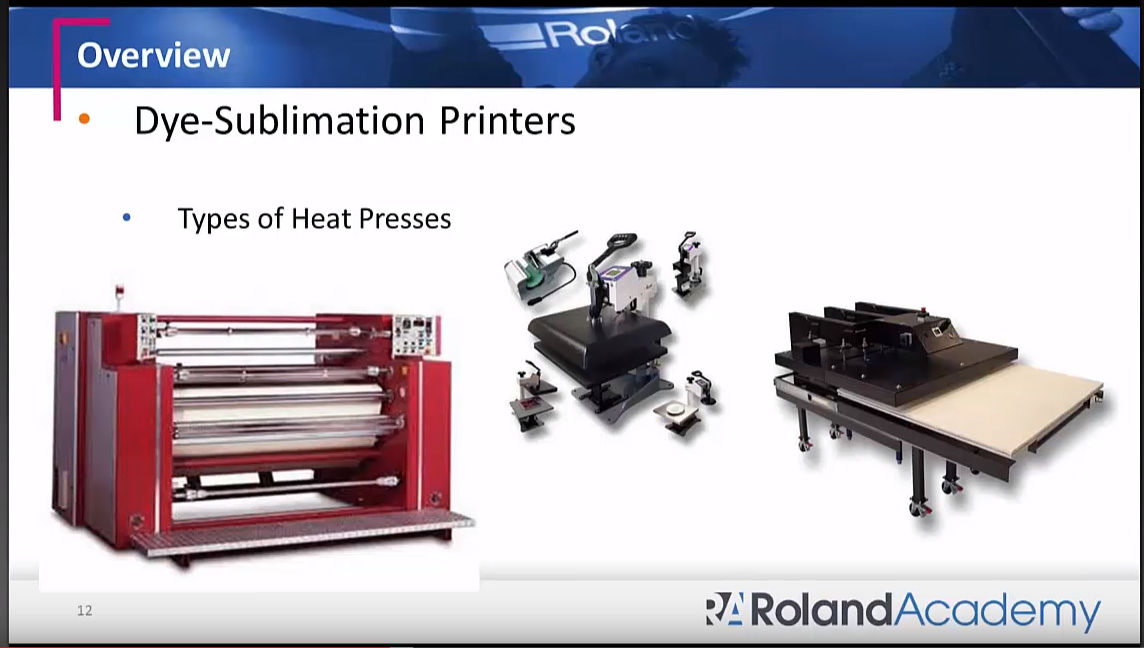
For smaller specialty items, this middle press right here - you have your flatbed - great for t-shirts, things of that nature, mouse pads or even metal panels. There are attachments you can also get, so you can do mugs or plates - just different things that have a different thickness and different curved shapes. And then people can get into specialty made vacuum presses to go over odd curves and things like that. So basically, it's the heat and pressure that that causes the sublimation process.
Then we have this big flatbed press on the right. If you're going to do full graphic shirts or multiple panels, then this has a larger bed where you can do many things. This is a great option as you grow your business. Say you want to do multiple shirts at a time or if you want to do all-over graphics on the shirt, this would be ideal because you have the space. And if you have those fleece throws or those personalized blankets, that will fit the large platen a whole lot better than your smaller guy.
Depending on what you're getting into will determine the type of heat press. It could be a similar heat press, like what you would get if you were doing direct to garment, like the flatbed, or you can get that rotary heat press if you're going more into soft signage or even cut and sew pieces. For cut and sew pieces, there is a table that works in conjunction with the rotary heat press where it feeds the table. You just lay your pieces of fabric and printed transfer paper on there and it feeds it to the roller. So you're not limited to just the roll-to-roll pressing.
DTG Printers vs Dye Sublimation Printers
Let's do a quick overview comparisons of DTG printers. Here's some quick bullet points. DTG printers are primarily an apparel decoration process. You can do mousepads and other things. From what I've seen, from some of the different manufacturers, it's opened up to a few other items like tote bags, caps and sleeves with special platens that they've come up with but primarily it is for apparel decoration. It is good for 100% cotton, dark and light. Let me just do a quick note on that. Not all cotton is created the same. The higher quality ring-spun cotton with a tighter weave, like a 30 to 1 weave, is ideal. What that does is it closes the pores, it gives you a more even surface to print on and you don't have the loose fibers hanging around that could clog your printheads. Garment selection is key to having good prints on your DTG printers. It can work on polyester or synthetic fabrics but remember pretreat, pretreat, pretreat. You have to do a very good job with that and that's where a lot of the learning curve is, making sure you have the right amount of pretreatment. It's necessary to have the vibrant colors and the wash fastness. Pretreatment definitely requires skill.
Remember, white inks still remain a problem. DTG printers have been known to have issues with the printheads drying out or getting clogged with fibers. With the introduction of white ink you still have the nozzles clogging and that will affect your prints. Make sure that you do your daily maintenance and you have enough business to continuously print on a daily basis with white inks. This is not something you want to leave sitting around. You need to have the business for the dark colors, the dark fabrics or start off with CMYK and don't go dark fabrics first. Even if you print directly on the fabric, remember you still need to cure the inks onto the fabric with your heat press. Those are some key things to keep in mind as you're weighing the pros and cons of a DTG printer or dye-sublimation.
Dye-sublimation printers, as I've noticed, are very versatile and is not limited to fabrics. You will see dye-sublimation in apparel, home furnishings, soft signage, personalized rigid substrates like those metal panels that are so popular now that have the beautiful photographs on there are done through dye-sublimation. This can definitely give you more bang for the buck as you expand your offerings. The requirement is, you need polyester fabric or any type of polymer-coated hard substrate. Not only that but it has to be able to withstand 400 degrees and some pressure for a certain amount of time. For fabrics it can be 45 to 60 seconds or maybe a little bit longer depending on the type of fabric the thickness. For hard substrates it could be anywhere between a minute, five minutes or longer also depending on the type of substrate. Your mugs may take about five minutes. Your flat metal panels may take 60 seconds. Your tiles might take 5-6 minutes. It all depends on the actual product itself.
Additional pre-treatment is definitely not necessary. You don't have to go through that process. What some people have tried to do to cut costs is just take cotton and add a polymer pre-treatment or they've taken certain products and added their own polymer pre-treatment. But there's a learning curve because if you don't apply it smoothly or the correct quantity, that's going to affect your end result.
There are a whole bunch of dye-sublimation blank vendors out there that sell shirts that are polyester to other blanks that have the coating. So you don't need to play the guessing game of “did I put enough layers on do it smooth enough”.
Once again, the sublimation process takes place at the heat press so when you see the prints come out on your transfer paper, don't freak out. It will look dull. When you sublimate at the heat press, that's when the colors will pop. Judge your colors after you're done at the heat press.
Depending on what you're doing, additional finishing may be needed, like sewing or seeming. You may need to invest in a sewing machine or other things if you want to do a little bit more than just t-shirts. There are t-shirt blanks that you can decorate. However if you want to get more creative and you want to cut and sew different pieces, then definitely you will need to invest in a sewing machine.
Dye-sublimation application ideas
So let me show you a few examples. I have a couple examples of direct to garment prints to give you an idea. Then I have a variety of different dye sublimation examples for you to take a look.
What I will do is, I will start with just a couple examples of black or dark shirts that you can do with direct to garment printing.
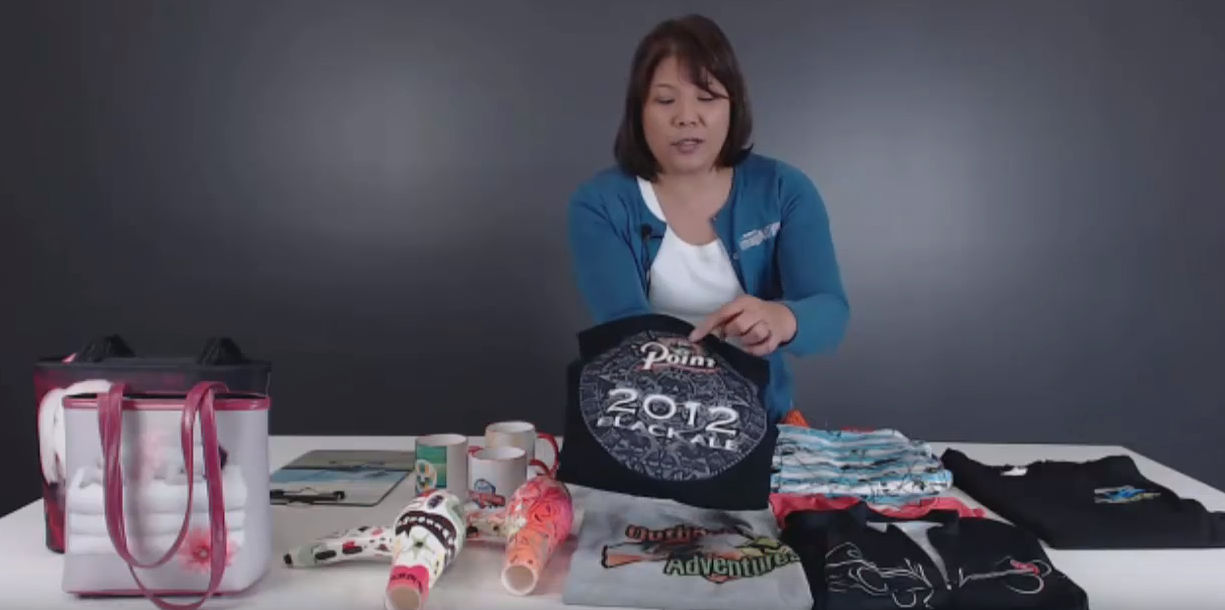
Something like this, you would lay down your white ink first. Some of the white inks will show. That will be part of your graphics. You'll design what prints and what doesn't print in your artwork and in your rip software. Something like this would be an example of “gosh i want to print something… I want to do dark Cotton” and direct to garment would be ideal for something like that.
The neat thing, when you're doing printing, that is better than screen printing, is that you can do photos to gradient colors in multiple colors. With screen printing you're limited to just a few different colors before it gets really costly. But cost-wise, screen printing will be better for longer production runs.
For short production runs and customized shirts you can do something with direct to garment and it's definitely not limited to these black shirts. I just figured black would show one of the good points of getting a direct to garment printer.
Dye-sublimation and Custom Apparel
Now we've got dye-sublimation. Ideally you can see you start with a white polyester fabric. This one… A lot of the bicycling and jerseys and other jerseys are dye sublimated. If you look at it inside-out, it's white. What you've done is, you've pretty much designed the full colors. You have the different pieces that you will sublimate onto the fabric, and then you sew. You can do a cut and sew after. Because you have the back pockets back here and it's a different design. The sleeves have a different design. You assign your black color. So you don't start with a black surface because there is no such thing has white dye sub inks. You start with white and you assign your colors and your blacks can still be very vibrant.
Here's another shirt. If you look on the inside it is white. That's your telltale sign that's a dye-sublimated process. This one was also cut and sew because you don't see any seams. Usually, if you just take a shirt and you put your graphics on and you do the press and then you flip it over and press - if you do it that way with a t-shirt blank - sometimes at the edges or the seams where the inks didn’t come through, you may see a little bit of white line. With this particular one there's no white line, so what they did was they did different pieces and then sewed it all together. It looks really nice.
There is a company called Vapor Apparel. They make a bunch of different types of shirts and dye sub blanks as well as colors. This one is made with 100% spun polyester. I know you can't see it, but it definitely looks and feels like cotton versus the polyester like these performance-type shirts. If your graphics are bold enough, you can sublimate on to light colored fabric. Like with this one, the graphic colors are definitely bolder, so when I sublimated onto this gray shirt it didn't look washed out. It has that nice soft hand and it's very durable and have washed it many times and it still looks really nice.
Once again it, has to be 100% polyester. You can possibly get away with 80% polyester. The thing is, the sublimation inks sublimate and gas out and grab onto the polyester fibers. Whatever sticks onto the cotton will wash off so it's going to have a more vintage look.
You’re definitely not limits it to shirts. You can do shorts. This is more the cut and sew. This one actually has a good example of when it was pressed, when the printed paper was placed on here and the pressing took place, the garment actually wasn't pressed properly so there were some wrinkle lines. It's hard to tell, but there are some wrinkle lines. Actually it looks like it's part of the design. It's kind of cool-looking. Here are a couple of wrinkle lines that the image is pressed onto. If you unfold it and widen it out, you'll see this big gap where the inks didn’t penetrate or take place.
The one thing with doing an all-over press on to different garments without sewing is you need to make sure that your fabric doesn't start with any wrinkles because then your end results will have lots of wrinkles. Unless you want to make it look fashionable. I've seen some of those where “I meant to do that, it's fashion forward”. You can charge higher for that.
Here's another one. This is more of a print, cut and sew. Once again, the inside is all white. These are just ideas of what can be done with dye-sublimation. Definitely you will need the bigger presses to do those - calendar roll press.
Different Dye-sublimation Applications Ideas
Cushions. You sublimate on to that. Actually, you sublimate onto paper or print onto paper, sublimate onto the fabric and then you finish it off.
Personalized bags. I know you see that all over the place.
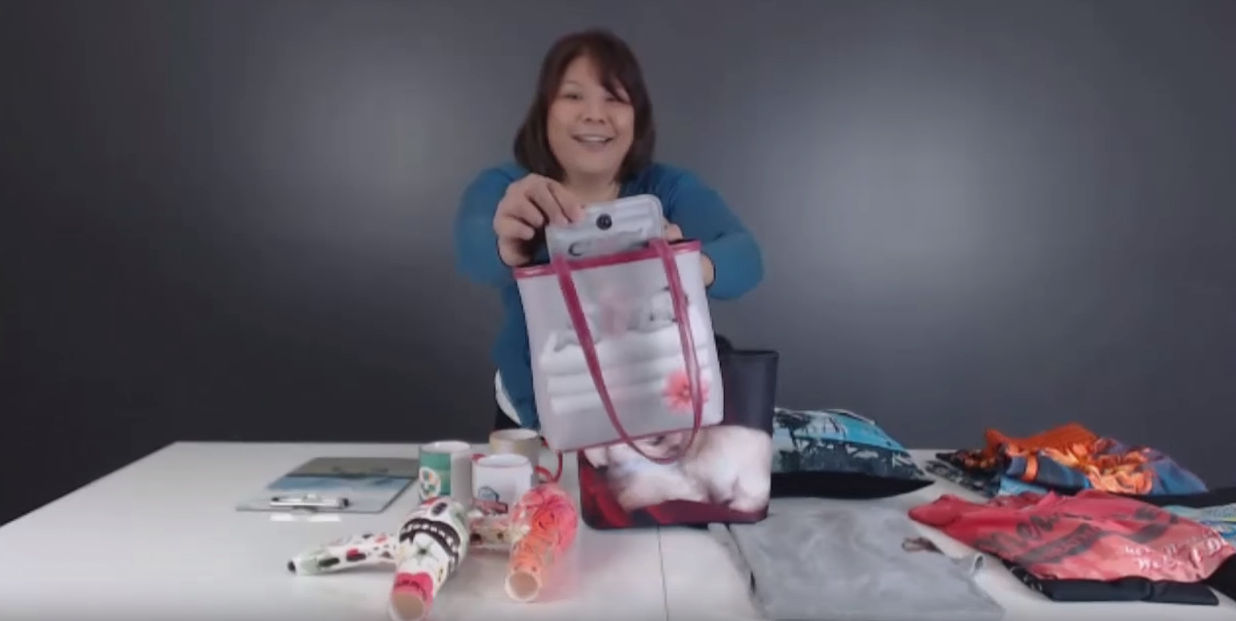
Great gifts. The flap in here is also dye sublimated. Just a lot of versatility. And as you can see, different shapes.
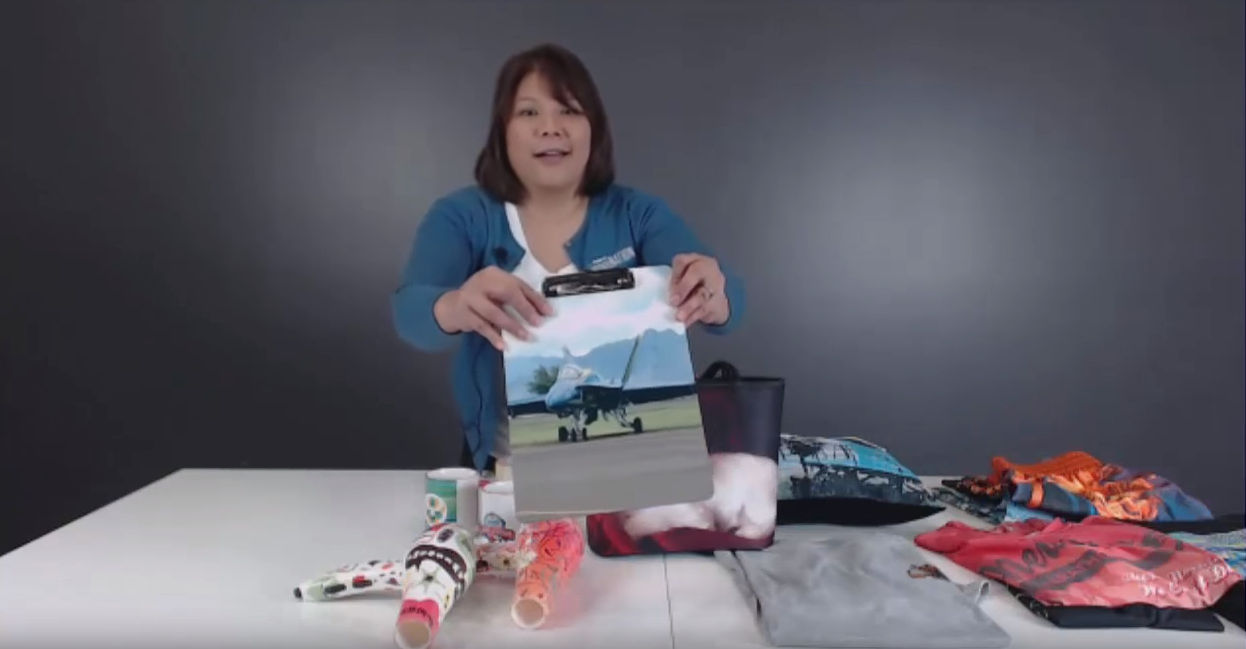
Dye-sublimation and hard substrates
Now we're looking at hard substrates. This is a clipboard that was sublimated on - so the board was blank and you add the hardware afterwards. Mugs. You know the personalized mugs. A lot of these are done with dye-sublimation. You print a mirror image onto paper. Cut off the paper. Wrap it around the mug and put this into a mug press. So you’re not limited to a flat surface. You can also have curved surfaces.
These were sent to us to display in our creative center. This was sublimated onto. Obviously it was done with a specialized curved vacuum press. Quite interesting. Quite neat… some of the different things that you can do with dye sublimation.
Let's finish off with the powerpoint. Just a couple of more slides and then I will get to the questions. Some comparison numbers in regards to start-up costs. Let’s go over real quickly startup costs.
DTG Printers Start-up Costs
DTG printers. These are just some numbers that i found. Printer-wise… decent printers… reliable printers… you're going to look at around 15-20 thousand dollars. Then you have your pre-treat accessories and various supplies. Depending on whether you go with that sprayer thing or the drawer, that's going to vary. So I just put in a range of what I saw out there. Then the heat press. I just figured a small heat press that I had in the slides just to start out. So you're looking at an initial investment of twenty to twenty nine thousand dollars. This is not including training or inks and all the other stuff.
From what I saw in some blogs and forums online… what is a good expectation of the number of shirts that you can do per hour? The one blog that I saw said you can expect to do about 20 to 50 white shirts per hour. 20 to 50 white shirts per hour. It didn’t say how large the graphic was so let's just say it's 12 inches by 12 inches. Just one square foot. However, dark shirts can be about eight to fifteen shirts per hour. Your number… your quantity drops dramatically when you're doing dark shirts. Those are just some thoughts from people who have been doing this. You have your expectations now.
Dye-sublimation Start-up Costs
In regards to dye-sublimation, what I did here was… the cost of our printer is $19,995; round it up to $20,000. Inks. You have 8 one liter pouches that you can put in there. It’s definitely designed for higher production. The inks are $9 per liter or bag… you need eight of those. And transfer paper. Our transfer paper is $250 - 260 dollars. It's 64 inches by 443 feet. The rule of thumb here is… start with good transfer paper.
I'm going to go on my soapbox regarding transfer paper real quick. Why you want good transfer paper is you want it to stay flat while you're printing. You want to not only hold the inks, but hold it where it doesn't run. Especially if you have a lot of fine lines and details. Good paper will transfer eighty to ninety percent of the inks from the paper to your fabric. Good papers will run you around nine and a half to eleven cents a square foot. Stay away from anything that's three to five cents per square foot just because the last thing you want to do is have to lay down more inks to get the colors and vibrancy that you need. When you start doing that then the paper starts buckling, you can get the head strikes and then print heads are very expensive. And you don't have to rerun the job over and over again. In the long run you end up wasting more paper, more inks, more time when you go with your three to five cents per square foot. You want to go with something that is reliable. You do your job once and you don't need to redo it because of a head strike or something like that. So off my soapbox regarding transfer paper.
Heat press. Depending on what you get, it can be as low as $4,000. I just put $20,000. It's more like that entry level for that rotary calendar press. Now if you really want to go top of the line calendar press, you're looking at around $75,000. That is if you are running multiple printers for dye sublimation and that's all you do… that is your bread and butter… this is not a side job. Heat presses can vary but I just figured an entry-level rotary calendar heat press. About a $20,000. A total investment of roughly twenty five to forty one thousand dollars.
Now here's the difference too. Average production speed. I'm just going to quote you some speeds based on the RT-640 dye sub. If you have it set up in four colors, which is dual CMYK, and you're doing four pass 540 x 360 production mode, you can get about 235 square feet per hour. For eight colors, figure about a hundred fifteen square feet an hour. That's a lot of prints. Especially if your shirts are one square foot of graphics, you can definitely get more than 20 to 50 shirts. Even with the press time and everything, you still are pumping out a good amount of shirts.
Those are just a couple things to take a look at and consider as you're considering the different types of of technology: direct to garment or dye sublimation.
Final Thoughts
For those that I didn’t get to, I will definitely reach out to you directly. This pretty much concludes today's webinar on DTG vs dye-sublimation. I definitely appreciate you attending and I hope that this has given you some answers and some information so you can make good decisions. Either way - dye-sublimation or DTG - the main thing is, make sure you have the business first before you invest. Because as you saw, there are higher costs up front. Make sure you have the business because the last thing you want to do is spend thousands of dollars just to have it sitting around collecting dust. Send it out to a wholesaler, build that business. Once you get the business, then invest. Definitely learn as much as you can. Go to blogs, conventions and just learn and see what's out there and what works best for you. There's definitely lots of options. Technology has changed but there are still some bugs that need to be worked out. For instance... from the nozzles clogging with white ink and even pigment inks not working as well for certain types of fabric. Definitely go out there see what's going on.
We have support videos and documents on our YouTube channel, so that's listed up here. This webinar is being recorded so it will be on the webinar archives along with other webinars that we've done, not just about dye sublimation but a whole host of a variety of things. That can be used as a resource. Check out those websites and feel free to browse through the archives and that way if you have any questions, hopefully some of these instructional webinars can help you answer some of those questions. With that I thank you for your time you spent with me and have a great day.