
One challenge many users are facing regularly is how to print neutral gray designs. We have to admit, gray is one of toughest colors to achieve because it uses all four colors on the printer, and they have to be perfectly balanced. Any small variances in the ink amount can shift the color. Here are a few tips to help you achieve that perfect gray color.
1. Using the right tool for the job: First and foremost, selecting the right media profile for the printer/ink/media/resolution at hand is the most important step for producing ANY accurate color. This principle applies to reproducing grayscale images as well. When printing any color, VersaWorks takes into consideration both the media’s white point and how it reacts to different ink levels. Then the software calculates the right amount of ink necessary to produce the desired color. Inaccurate color or tinted gray should be no surprise if you are using a different media than the one you profiled.
If you cannot get neutral grays, even with the right profile, you should try these techniques:
- Make sure your print heads are calibrated and firing properly. As mentioned above, any small variances in the ink amounts can cause the gray to shift from one color to another. A misfiring nozzle will affect the amount of ink as well, producing a banding effect and changing the color
- If you are using the right profile, the printer is working perfectly, and you still have problems, you may need to relinearize your profile. Linearization brings your printer back to a known normalized state, just like wheel alignment and balancing make your car drive smoothly and straight. You will need a measurement device such as i1 Pro to linearize you printer. You can find more information on profile linearization here or by watching our archived webinar on the topic.
Note that our new XR-640 with light black ink produces better gray images because it primarily relies on light black for grays.
2. Using Roland DG Color or color management settings in VersaWorks: Depending on the way your file is created, there are few methods you can use to configure the printer to use black ink only.
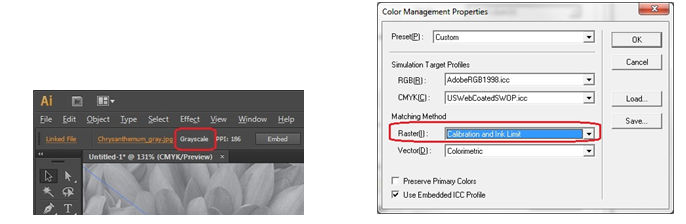
- For files containing a single grayscale bitmap image – make sure the bitmap is truly grayscale in your design file and select Calibration and ink limit for Raster in VersaWorks’ Color Management Properties when printing. This will prompt VersaWorks to print the image with black ink only.
- For files containing a few grayscale vector objects mixed with colored vectors – The best method in this case is to use the Roland DG Color library. Print the Roland DG Color library chart and apply the best gray from the chart to your design.
3. Thinking Outside the Box – We highly recommend this method, which is very creative, yet simple – and it works with any integrated printer/cutter.
- Separate your design file into two files: one with gray objects only, and another with colors.
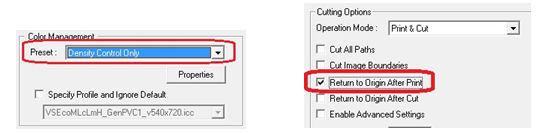
- Print your grayscale-only file using the Density Control Only preset with Return to Origin After Print checked.
- Print the second file (with color images) using your normal settings.
This approach will print the first file using black ink only and then return the media to origin to print the color images on top. The results will impress you.
