
by Daniel Valade, Product Manager of Digital Print - Roland DGA
VersaWorks 6 has been updated with dozens of new user-friendly features over the years that turn complex workflows into simple functions automated by the RIP software. However, along with all the newly introduced tools, there are also a few tricks that are useful, but have been around a long time and are therefore often overlooked.
With the popularity of printed patterns for applications like heat transfer vinyl, wall coverings, and wall graphics, it’s a great time to revisit an old favorite – “Step and Repeat.” The effect is taking a single pattern or design and repeating it in a pattern without having to design at full size. Think wallpaper, background logos on a banner creating a watermark effect, or even patterned vehicle wraps.
- In the job list, right-click the job to be printed.
-
Click Step & Repeat.
The Step & Repeat window appears.
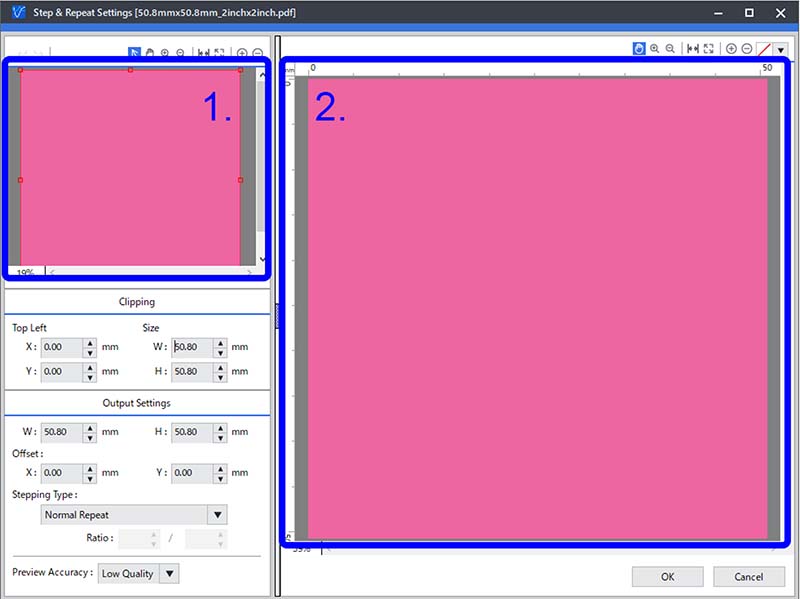
1. Preview area
2. Layout area
If you want to set the image's area to print, proceed to step 3.
If you want to use the entire image, proceed to step 4.
- Set the image's area to print.
There are two ways to configure this setting:
- Entering the values
- In Size, enter the width and the height of the clip area.
-
In Top Left Position, enter the location of the upper-left corner of the clip area with the origin at the upper-left corner of the image. The clipped area appears in the layout area side by side.
Top Left Position can be set within the range such that the clip area set with Size does not go beyond the edges of the original image. Be sure to set Size before setting Top Left Position.
- Dragging the mouse over the preview area
- In the layout area, click

-
Point to the small square (the clip point) on the clip line (the red line in the figure). The pointer changes to
 (a shape with a point in the upper-right corner).
 -
Drag the clip point to set the clip area. The clipped area appears in the layout area side by side.
To fine-tune the clip area, use
 and
and  to enlarge the preview image, and then drag the clip point again.
- In the layout area, click
You can also combine both methods to configure the settings. For example, you can set the clip area roughly in the layout area, and then fine-tune the clip area by entering the values.
- Entering the values
-
In Output Settings, set the W (width) and H (height) of the image to output.
Adjust according to the media size and the number of images to be printed side by side. To print the entire image side by side, set the media size so that it is larger than the image size.
- In Output Settings - offset, fine-tune the position of the image in the X and Y directions.
- In Output Settings - Stepping Type, set how to arrange the images.
- Normal Repeat: Aligns the horizontal and vertical positions of the repeated images.
- Horizontal Repeat: Shifts the image horizontally.
- Vertical Repeat: Shifts the image vertically.
- In Output Settings - Ratio, set the shift ratio.
This setting is only required when Horizontal Repeat or Vertical Repeat is selected for Stepping Type. If this setting is not required, proceed to the next step.
- Check how the images are positioned in the layout area.
- Click OK.
You can use Preview Accuracy to set the accuracy of preview images displayed in the preview area and layout area.
