
Printing on hemmed, grommeted stock saves time and money
One of the things that digital printing makes easier is banners. I noticed in the Design & Price [SignCraft, March/April 2008] feature on a 4-by-12-ft. banner, that three of the four sign designers who participated described producing a digitally-printed version. It's fast, and it lets you use color without worrying about how many colors or layers of vinyl it will take.
I print a lot of banners for the same reasons. Sending them out to be hemmed and grommeted, used to add time and expense. Recently, though, I had the opportunity to help test a new banner stock called Ready2Print Digital Print Banner Rolls [Cambridge Canvas, 800-265-8151, www.ready2print.ca] that is hemmed and grommeted–and goes right through the printer.
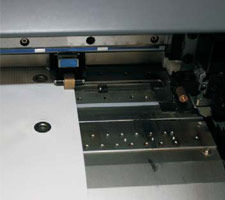
When I first saw it I said, "It's going to take a lot of talking to convince me to put a metal object through a $25,000 machine..." I was afraid it might damage the head. But after an incredible amount of testing, I am convinced this product is a winner. The only thing you have to do is remove the knife from the head and raise the head to the setting for the thickest material.
There's a big time savings when the banner is ready to deliver right out of the printer. It makes a job like this one that much easier.
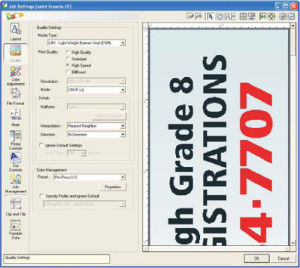
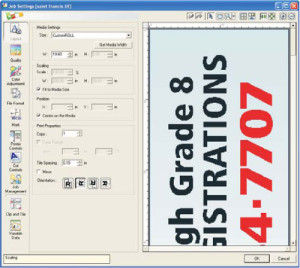
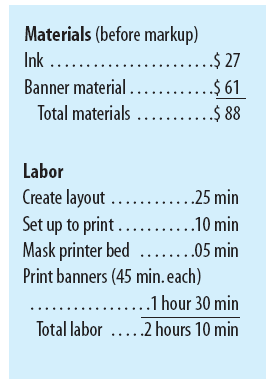
Create layout: 25 minutes I did the layout in CorelDraw X4. As with any format, you must design using the maximum print width so your design will fit accurately on the stock. I did the layout at 19.6 in. wide to make placement easier. I saved it as a CDR file, and exported the design as a 150 dpi RGB TIFF file. These screen shots show the settings in Roland DG's VersaWorks.
This banner was long and narrow–20 in. by 20 ft.–which is a tough format for any layout. As with any problem format, though, I used panels to help control the message. It's best to deliver the message in readable chunks anyway.
Set up to print: 10 minutes
You can print right to the edge of the roller that grips the edge of the banner. Because the edge of the stock is folded over 13/4 in. and welded, you can even trim that outermost white portion off if you want a full bleed. Note that the cutting knife has been removed and the head height has been set to high.
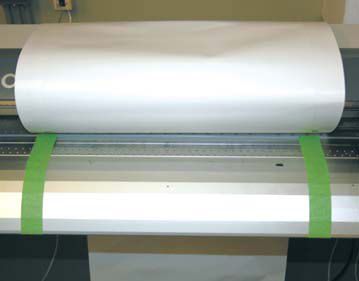
Mask printer bed: 5 minutes
Since some ink may spray through the grommets and end up on the bed of the printer, lay two strips of masking tape on the bed in line with the grommets. It's easy to see where the tape goes once you load the material. On this narrow stock, I put the stoppers on the feed roller to make sure the material tracks accurately. I've been lazy about this on long banners in the 20-in. width and had it wander a bit.
I use 40 cents per square foot as may estimated ink cost. That may seem high, but it includes my markup, which should always be included in material costs. I'd estimate my ink costs at $13.60 per banner. There's a savings in using the Ready2Print stock, too. If I had to send these banners out to be hemmed and grommeted after printing, it would have added $50 to the cost of the job. The banner material comes in four widths: 20.5, 32, 45 and 54 in. wide. On my Roland DG VersaCAMM printer, I need about .4 in. on each edge to accommodate the rollers. So on the 20.5 in. stock, that leaves a maximum print width of 19.7 inches.

Print banners: 45 minutes each
The banners were printed at high speed, 360 dpi. As you can see, the printer prints right over the grommets here as it winds on to the take-up reel. Once printed it takes about 10 minutes per banner to trim them, wipe the ink off the grommets and roll them up for pick-up.
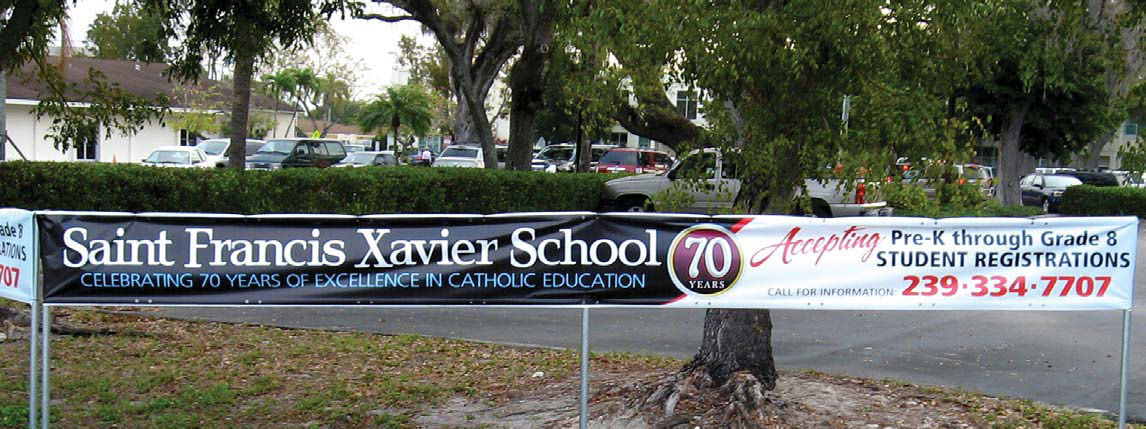
Here's the completed banner. The 14-oz fabric is sturdy enough to hold up for quite awhile outdoors. The print is not laminated, but should still look good for three years or more.
The ability to print nearly full bleeds is great, but I think this material will see a lot of use for those everyday production banners, about like the right hand panel of this banner. It's a really efficient production substrate–ideal for knock-out work.
